
Revell-Matchbox 1:32 Sea Venom Vampire NF Fuselage Construction


Well time for an update. I’ve got the wings and fuselage together and all the wonderful pictures I took were erased by my youngest when she decided to borrow dads camera. Oh well c’est La Vie!
Just some information about the build so far then! I had trouble closing the fuselage halves with the engine inside nothing major and the fitting work was done in an hour or so with the help of my motor tool. The inside of the fuselage where the back wall attached to the motor sits needed work and I had to reduce the size of the firewall too. I reduced the size of the lip by half and took off about half a millimeter from the firewall and everything fit snugly and was set aside so I could assemble the cockpit.
once that was done I glued it into the left half of the fuselage and placed the motor against the same side and closed the fuselage up. I ran Tamiya thin cement into all the seams and then held everything tight with the liberal application of Tamiya masking tape. (Wonderful stuff!)
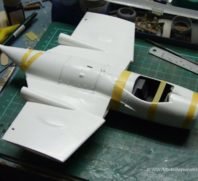
Everything lined up fairly well I then worked on the wing roots and glued the wing halves together and clamped them for a while to let the cement dry I then started to fit them to the fuselage. It became obvious that the fuselage curled inwards, however it was a simple matter to correct it by running thin cement between the wing joint and the fuselage then pressing the fuselage side against the wing and holding it there with a piece of scrap sprue braced against the engine till it had set. I also put the canon bay cover on to to provide a means of making sure I glued the front of the fuselage correctly and didn’t narrow it. Now I need to paint the inside of the fuselage to match the cockpit. (See picture)
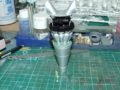
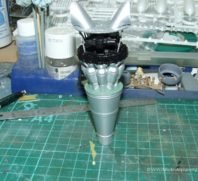
To strengthen everything up I then added the tail section of the fuselage and I decided to cover up the motor as well with all the extra panels on it’s come up really well! Only a small amount of filing was needed to get everything to go together. There are no great gaps and it looks pretty darn good!
I’ve taken some pics of the completed fuselage and wing so you can see how it all fits together.
Now there’s the seam that the Matchbox engineers decided to put two very prominent location pins at almost the very end of the Goblin motor’s exhaust which when seen from the rear give the opening a very distinct oval shape. I waited till the tail pipe had dried suitably and then just filed them away so that it looks pretty much round. See the above photo’s of the rear of the Sea Venom to see the finished result.
Related Posts
Categories
- Airfix Model Airplane Kits
- Airplane History & Use
- Build Reviews
- Dragon Master Kit 1-48 Fw1908A-8
- Featured
- Hasegawa Model Airplane Kits
- Heller Model Airplane Kits
- ICM Model Airplane Kits
- Italeri Model Airplane Kits
- Kiwi Wings Model Airplane Kits
- Model Kit Tips & Techniques
- Revell Model Airplane Kits
- Signifer Model Airplanes
- WW2 Model Airplane Kits


Leave a Comment