
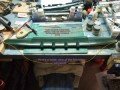
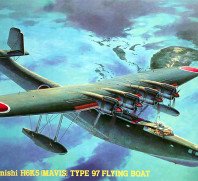
Hasegawa 1:72 Kawanishi H6K5 Mavis Progress
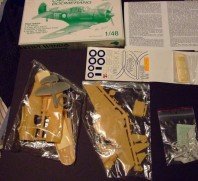
HASMA18 Kawanishi H6K5 Mavis

Well the Mavis has been taking a back seat to everything else I’ve been doing over the last few months, but here’s an update to show you where I’m currently at in the build.
She’s mostly together with the interior built and painted, the fuselage together, the wings, floats, beaching gear and wing braces on. I’ll take you through what I’ve done so far in regards to how I approached the interior of this bird as Hasegawa doesn’t provide a great deal of interior detailing.
Firstly the cockpit floor wasn’t one solid piece – it had a gap between the pilots and co-pilots seats with a ladder to descend to the lower hull to reach the bomb-aimers and mooring positions. So the first order of business was to cut out the cockpit floor and put in a ladder with a rudimentary bulk head behind it. I also built the braces at the front of the cockpit floor.
With that complete I detailed the rear gunners position by building in some stringers and longerons.
Next, I removed the rather LARGE ejector pin marks on the inside of the fuselage – not strictly necessary, but I was going to build more of an interior than I actually did and they would have been in the way of that. I used my motor tool to remove them as it was decidedly faster than trying to cut them away with a scalpel. (And extremely sharp objects and I don’t play well together!)
Once that was done I painted and detailed the inside as much as I thought necessary (Read not a great deal!) as not much will be seen of the interior as the transparencies are rather thick and the optical clarity isn’t good. With the insides painted and the fuselage transparencies in place I glued up the fuselage and moved onto the wings.
The wings are huge even in 1/72 scale over 550mm, it’s easy to see why we probably wont see this kit in 1/48 scale. The biggest challenge with this kit is to get the wings to sit where they should and not to have the braces bowing as I did on mine till I moved the wing up to compensate for it. I still think that the wing is a little higher than it should be but it still looks pretty much like it should and that’s good enough for me …….. for now! One word of warning regarding the flaps when using Tamiya extra thin cement, capillary action is a bitch! The thing I like most about this glue was the undoing of movable flaps on this model. So I glued everything in place and set it to the angle desired figuring that it would be stronger and more stable that way.
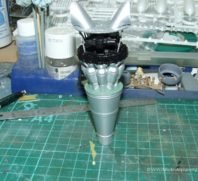
The engines were next, I painted them Tamiya matt aluminium and then gave them an oil wash to make the details (such as it is) stand out. I glued them in place and then painted the cowls, I had decided that I wouldn’t try to glue the propellers in and risk it all seizing up so they’ll be simply slid into place when the model is finished, it’ll also make it easier to paint them as well. Now the job of masking all those transparencies starts in earnest, not an easy one but it’ll look fantastic after it’s done. Once that’s all complete it’ll be onto painting the beast!
Cheers, and Happy Modelling
NzFlyBoy
Related Posts
Categories
- Airfix Model Airplane Kits
- Airplane History & Use
- Build Reviews
- Dragon Master Kit 1-48 Fw1908A-8
- Featured
- Hasegawa Model Airplane Kits
- Heller Model Airplane Kits
- ICM Model Airplane Kits
- Italeri Model Airplane Kits
- Kiwi Wings Model Airplane Kits
- Model Kit Tips & Techniques
- Revell Model Airplane Kits
- Signifer Model Airplanes
- WW2 Model Airplane Kits


Leave a Comment