
Kiwi Wings 1/48 CA-12 Boomerang
 The Kiwi Wings boomerang is no picnic, definitely for the confident experienced modeller. I’ve built this kit twice and the second time while not that much easier, was much better than the first time as I knew what I was in store for, forewarned is forearmed. There is little in the way of cockpit, you get an instrument panel, rudder pedals, seat, floor, joystick and some side wall detail. Anything else will need to be scratch built or accessed from the spares box. The internal structure was much like the Hurricanes and the Harvard from which it was derived, tubular steel framing with panels then attached to it, which means that this must be built. There are instructions in the assembly guide to do this and this time round I did so. I built it by using foam board and pins, with the shape of the frame drawn on in pencil, the dimensions of which were transferred from the instructions and then cutting evergreen round plastic stock to suit, gluing it together while still on the foam. The idea behind this was two fold, it held it’s shape while it dried and it could stand up to a certain amount of handling once fully dry. I built this internal framework and the added all the little bits and pieces to it, instrument panel, rudder pedals, compass, armour plate throttle etc, before installing it in the interior of the fuselage.
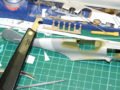
Now because this is all low pressure injection moulded there are huge channels on the inside of the fuselage and wing (see pics for what I mean) and they will need removal before assembly. I actually found myself using my motor tool quite a bit sanding down the channels and thinning the walls of the fuselage to accept the structure I had built. The engine itself is a half engine on a bulkhead that fits inside the fuselage. You will need to locate the correct point inside the fuselage to attach it as there is nothing to tell you where it goes on the actual parts themselves and place plastic strip on both sides of the fuselage to provide something to glue it too. While the resin engine doesn’t look to bad it will need the ignition harness built for it and push rods if you’re so inclined, I was not! Once the internals are built and you’ve buttoned up the fuselage you can move onto the outside, the wings, tail and stabilizers are all butt joints, which you can add pins to if you wish but I found the joints strong enough without. The surface detail was finely recessed panel lines that were not particularly consistent but not surprising give the way the kit’s injection moulded. You will need a little judicious rescribing to obtain a little consistency and to give the panel line wash something to flow along.
There’s not much in the way of wheel well detail either, they are covered over but the detail should resemble a Harvard’s construction. Not wishing to build the back of the engine etc I left these covered over. (yes I’m a coward I know) It’s just matter of drilling holes in the bottom wing to accept the landing gear. On the subject of the landing gear there are no brake lines but they do have sufficient detail. They are cast in white metal along with the propeller and bottom of the wing tips, these will need a little packing out or the wings will need thinning when building as they don’t quite line up. Careful sanding is the order of the day here to get the wing halves together nicely. The wing canons are also cast in white metal and show the canvas cover detail rather nicely. But again attention to where they go is necessary, and careful filing to get them into to place will be needed. Once all this is done the basic aircraft is complete and you can then concentrate on getting the canopy into place, here you will need to reduce the top of the fuselage where the back of the canopy goes to get it to fit correctly. The reduction is actually quite a bit, also the canopy is supplied it two parts the back of it that goes over the spine of the aircraft and the front wind screen and canopy as one part. This will need to be cut away if you wish to show off interior. I decided not to as it would have require more surgery of the fuselage spine to accommodate this correctly.
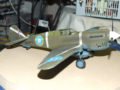
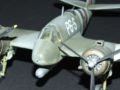
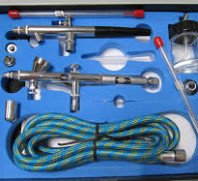
After much filling and sanding I could move onto painting the model, here again I ran into problems, nothing to great, just trying to figure out what colours to use for the paint job. Australian imported aircraft when first assembled wore the paint scheme from the manufacturer eventually being repainted when repairs were done. Indigenous aircraft were painted with Aussie produced paints direct from the factory. These colours were ones created by the Aussie paint concerns and are something of a hot topic regarding colour shade fading etc. I mixed my own Aussie sky blue and used BS colours for the topside, dark earth and dark green. Should actually have been foliage green and Aussie dark earth but they don’t look to bad. Painting is fairly simple and straight forward easily done freehand with an airbrush as I did. Although you can get masks to do the job as well I believe. After painting I gloss coated the model and put on the decals, not too many but enough to make it look damn good. There are several subjects in the kit two military and one civilian. I then used a draughtman’s fine ink pen to fill in the panel lines and redraw them where the detail had be all but obliterated because of sanding etc. Once that was done the model was pretty much complete just a little light weathering and et viola DONE! These aircraft were quite highly waxed in some cases to reduce drag and make them as fast as possible, check your sources to ensure just what kind of finish you need.
Now it may sound like the kit was quite a lot of trouble, and while not a Tami-gawa wunder kit, I enjoyed the challenge it provided and how it stretched my abilities beyond my comfort zone. THIS is the only way we can grow in our abilities, to push the envelope of what we are capable of achieving. While not a shake and bake kit I think that you’ll be rewarded with a great model and some extra skills if you attempt this kit, just take your time plan what you are going to do and do it to the best of your abilities. I highly recommend this kit for experienced modellers who have a few short run kits under their belts and want a decent challenge to build. These kits are available from Jays Models just follow this link and get one of your own! Take a look at the gallery to see what I’ve accomplished and the end result.
Cheers and happy modelling
NzFlyboy


Related Posts

Categories
- Airfix Model Airplane Kits
- Airplane History & Use
- Build Reviews
- Featured
- Hasegawa Model Airplane Kits
- Heller Model Airplane Kits
- ICM Model Airplane Kits
- Italeri Model Airplane Kits
- Kiwi Wings Model Airplane Kits
- Model Kit Tips & Techniques
- Revell Model Airplane Kits
- Signifer Model Airplanes
- WW2 Model Airplane Kits


Leave a Comment