
Finishing Revell’s 1:72 Dornier Do24T
Last time I left you wondering what could be done with the easily removed acrylic paint on the Dornier Do24T.
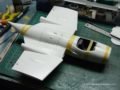
As I sat there musing what I could possibly do to make the paint more resilient a light went on. It occurred to me that if I was to cover it with something tougher it would make the paint last longer, so out came my trusty jar of Humbrol clear enamel varnish.
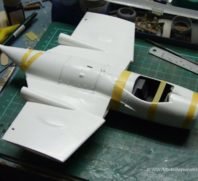
After liberally coating the upper surfaces I went to work spraying RLM65 on the planing hull. For this I used Gunze acrylics, I like these acrylics as they dry to an almost gloss sheen and decals go down on this surface well without silvering (well that’s the theory at least!) I find to get a well adhered decal I need to use Johnson’s Klear shine (Future for you Americans!) as a glue of sorts if I lightly coat the area with raw future before placing the decal, it drys and pulls down neatly into every nook and cranny.

Applying Decals to the Dornier D024T
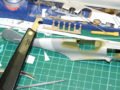
I consulted the instructions and found the version I had chosen to model had a minimum of decals to apply. But still a few, concerned I might miss some I crossed off the numbers as I went and carefully studied the drawings and pics I had accessed through the web, to be sure I was placing them in the right places! The decals went on pretty much without a hitch but I still had to get both underside crosses to sit down which I managed to do, well mostly.
 With the decals on, I set about giving the Dornier a top coat of flat enamel varnish. That went pretty well and I then did some post shading on the panel lines. I was quite pleased with the results and it now resides quietly on my bench waiting for me to peel off the masking tape which I will do at a later date.
I feel at this point it might be worth mentioning that it pays to leave delicate easily broken parts until last as I found out to my detriment. No matter how careful you try to be, you are always going to break something off… which I have done on a regular basis!
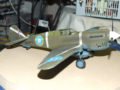
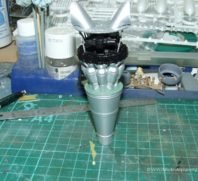
So all that remains now is to unmask the turrets and place the canon in it’s turret. Presto another model finished! And once again I’m left with the problem of where the hell do I display it?? My bench needs to be cleared I have models that are getting in the way.
I’m still waiting for one of the commission pieces to be collected. (Hint hint Rick!) But I have 1/72nd scale armour and 1/48 scale aircraft galore. Anyone wanna buy a reasonably well built model?? Drop me a line or leave me a message.
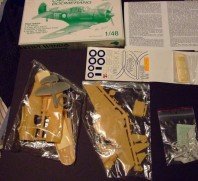
Next project will be another German flying boat dubbed the “flying clog” by it’s crews. The kit is made by supermodel and has ample raised details. Most would remove this but I decided I’d take the nostalgic route and build it with the lines intact, look for it in the next few days! You’ll all know where to find it!
Cheers
NzFlyBoy
| Kit: | Revell 1:72 Dornier Do24T |
|---|---|
| Manufacturer: | Revell Model Kits |
| Scale: | 1:72 |
| Type: | Injected Styrene |
| Paint: | Vallejo Air RLM72 71014 Gunship Green RLM73 Grey Green 71055 RLM65 71008 |
| Accessories: | None |
| Documentation: | Easy to follow pictorial with no errors or omissions that I could find. Used the colour call outs which seemed accurate at the time. |
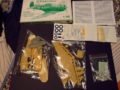
| Kit History: | This is the old Matchbox kit and suffers from the ailment of most of them very DEEP panel lines! Italeri has obviously rented the molds and produced their own kit. The major plus is that the decals in this boxing are by Cartograf! |
| Aircraft History: | Built in the late thirties as a Maritime reconnaissance and patrol aircraft this capable machine as used throughout the war by both sides! (The Aussies used the Dutch east indies ones till they were unserviceable or sunk.) |
| References: | Mainly online. Try this Dornier Do24T site |
| Kit Assessment | |
| Sprue Quality: | Good! Very little flash to speak of at least in my issue of the kit. Simple construction with little dramas involved. Attachment points a little on the thick side but that’s a hang over from the Matchbox days. |
| Kit Detail: | Sparse to non-existent but typical for a kit from this manufacturer. |
| Fit: | Good fit. little effort is required to get this kit to go together but care must be taken when assembling the parasol wing as this will setup the rest of the model. |
| Decals: | Fantastic! Printed by Cartograf in register and wonderfully thin and supple but a gloss surface is needed to get them to settle down without silvering. |
| General Comments: | Still the only game in town of this graceful sea bird I highly recommend it! |
Related Posts


Categories
- Airfix Model Airplane Kits
- Airplane History & Use
- Build Reviews
- Dragon Master Kit 1-48 Fw1908A-8
- Featured
- Hasegawa Model Airplane Kits
- Heller Model Airplane Kits
- ICM Model Airplane Kits
- Italeri Model Airplane Kits
- Kiwi Wings Model Airplane Kits
- Model Kit Tips & Techniques
- Revell Model Airplane Kits
- Signifer Model Airplanes
- WW2 Model Airplane Kits


Leave a Comment