
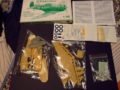
Dragon Master Kit 1-48 Fw190A-8 with Owl Resins Sg113 77mm Recoilless Anti-Tank Weapons


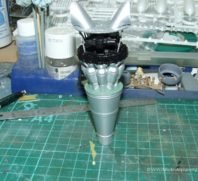
DAY 1-7: Okay so I started work on my next wingy thing. This kit has photo-etch in two thicknesses the I.P is made from stainless steel close to a mm thick and it’s totally next level in terms of detail. It does need undercoating though because I didn’t and the paint literally just wipes off it. There are also parts to make the headrest. The harness is around .25 of a mm and has aerials and the band for the drop tank. The kit would lend itself to have an aftermarket resin engine quite well as the cowling is a multi part affair. Being multipart though does create some complex joins that require quite a bit of finesse to get them to meet up. I built the engine cowl, the fuselage and the wings as separate assemblies. I then joined the wings and the fuselage together got it to fit reasonably well let it cure for a couple of hours and then attached the cowl. The bottom of the cowl where it meets the wings and fuselage was a definite challenge. The armoured ring that goes around the oil cooler at the front also has a representation of the front of the BMW801-D reduction gear ignition harness ring which will look good behind the cooling fan.
DAY 8-15: I’m enjoying this kit quite a bit I built the Fw190-D version of it in the promodeler boxing but it didn’t have the etch that this does and it was the inline engine not the radial. (Wonders if he’s just lost the armor fraternity) If you get the chance to build this kit I humbly suggest you do. The wheel wells are a mini kit in themselves, with bracing and barrels for the MG-151 eight separate pieces in all. The landing gear is also very nicely detailed with an accurate depiction of the mounting of the gear doors ( to me at least). The recoilless barrels are in place the new panel lines have been scribed and wheel wells have been painted and a little preshading has been accomplished. One thing I have noticed is that the recoilless barrels aren’t perpendicular but slanted inwards due to the dihedral in the wings. But nothing about sanding the mounts themselves or were the actual resin parts adjusted for this. I’m in two minds as to remove them and sand them till they’re straight up and down or whether to leave them as is. After some thought I decided to remove them took me around 10 minutes work removing each one individually then sanding it and putting it back before working on the next I now have them sitting at ninety degrees to the ground. At least as far as my Mk.I eyeball tells me.
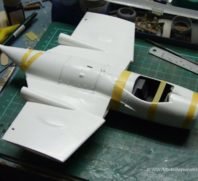
Day16-23: I’m making some kind of progress! I’ve used Vallejo acrylics for the camo scheme this time round and I have found them to be a little on the dark side. Well the RLM 74 RLM 75 combo at least, the underside RLM76 seems pretty good. The decals were very thin but were reasonably resilient as long as I didn’t over do the decal softener. Floated on a bed of Micro set they scooted around happily as long as you were careful and patient. I wasn’t patient enough with a couple and they broke on me. Once in place a lint free cloth (paper towel) was used to mop up the setting solution and remove any air from under the decal. I’m really very pleased with the result. I’ve gone over what sources I can find and it would appear that the test aircraft was devoid of the usual operational stencils. No walk ways or “do not push here” etc. Just a fuel grade symbol in the appropriate place and I’ve put the warning decals on the drop tank as it would have likely been drawn from operational reserves. I’ve got to do some touch ups around the tail area as I’ve had a little overspray. The Vallejo acrylics are touted as ready to use but seem a little thick I needed to raise the PSI to get it to atomise nicely.
Day 24-31: I’m rolling on with my build I’ve got a wash on for the panel lines I have found however that I should not rub to hard at the Vallejo paints as they’ll basically wear right off as I’ve found in a couple of spots. I generally seal my paint work before doing any washes and weathering but I was curious to see how the new Vallejo air paints reacted to solvents and weathering directly. The Fw190 was painted entirely with Vallejo inside and out and they were nicely resistant to the solvent used for pin washes in this case it was Tamiya’s enamel thinner. (White spirit) They were also a bit harder than previous batch’s of Vallejo I’ve used previously. The over spray was an issue with using the paint straight from the bottle as advertised it actually needs to be thinned just a tad.
Day 32 -49: I’m progressing with the weathering I’ve got the rather prominent exhaust stains on now done with Tamiya weathering pigments. I’ve just got to add cordite staining for the guns and a little mud spatter and I’m done with the weathering. Then it’s adding all those really fragile bits like gun barrels and pitot tubes aerial wires and giving the whole thing a coat of varnish and it’ll be finished! After a few more hours work over a couple of days and I’m done with the Fw190. I’ve done a few things I haven’t done before but the major one is the addition of an aerial. Bit of a learning curve with this but hey I’ll only get better! I really liked the end result it was definitely a learning curve with some of the new techniques I used with this build but really very pleased the end result.
Related Posts

Categories
- Airfix Model Airplane Kits
- Airplane History & Use
- Build Reviews
- Dragon Master Kit 1-48 Fw1908A-8
- Featured
- Hasegawa Model Airplane Kits
- Heller Model Airplane Kits
- ICM Model Airplane Kits
- Italeri Model Airplane Kits
- Kiwi Wings Model Airplane Kits
- Model Kit Tips & Techniques
- Revell Model Airplane Kits
- Signifer Model Airplanes
- WW2 Model Airplane Kits


Leave a Comment