
Revell 1:72 Dornier Do24T Assembly
Okay so here we are the part of the Revell 1:72 Dornier Do24T Flying boat build that I was dreading, joining the parasol wing to the fuselage! To be fair I delayed it a bit by building the engine cowls and painting the engines, as well as building the tail assembly and gluing it in place.
When I figured I couldn’t delay it any longer (not without trying to believe me!) I took a serious look at attaching the wing. Firstly I glued in the diagonal support and the two inverted V supports, when they were mostly dry I placed the on the fuselage and looked at gluing them in place but the were to unstable slipping around all over the place. I then removed the sponson supports and cleaned them up. (Yes I was delaying again!)
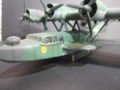
I studied the assembly drawings carefully and glued them in place and while they were still movable I placed the wing on top and flowed glue around the supports and then adjusted the sponson supports to touch the wing and glued them in place. Then I spent a few antagonizing moments as I checked that all was lined up. It looked wrong some how and I measured the various distances with a ruler and found I was half a millimeter out!
That wouldn’t account for what I perceived as being wrong! I then looked past the wings and looked at the tail it was at this point I realized the tail was out and canted off to one side. I’d left it to dry as to repair it would require surgery! I decided that I could live with it for now and left the wing to dry and took a break. It looked good sitting on its little clear cradle, this wee part is the neatest thing and a thoughtful addition! Totally clear and almost invisible under the fuselage. Allowing it to sit as it would on the ocean.

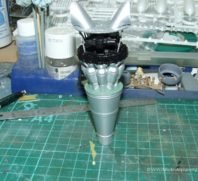
Next I glued the engine cowls on and painted inside them added the exhausts and when dry drilled them out. I then added the outer cowl rings and added in the painted engines, looking good!! With the model now near complete I added the final details to the wings and tail surfaces and then looked at the masking job that awaited me. It’s been a long time since I considered NOT painting a model but I thought about it this time.
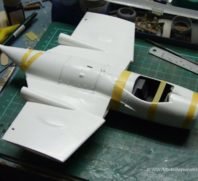
I saw the challenge that was before me and realised isn’t this why I model?? To accept the challenges a model provides and find ways and means to overcome them? So I gritted my teeth, put a fresh blade in my scalpel and off I went. Well after three days of off and on masking I had the turrets and canopy masked off and ready to paint. It was at this point I thought about painting the kit and what colours were needed. Did I have equivalents I could use?? The answer a resounding NO!
I then started a two day journey trying to figure out what paints I should use that gave a good representation of RLM 72 and RLM 73. I ended up using Vallejo paints for the first time. I used the acrylics and not the model air formulated for airbrush. (Possibly my first mistake, though not my last!) And proceeded to paint the base Coat of RLM 73 and found to my horror that a simple brushing of my finger tip was sufficient to remove the paint from the model!! (Groans!) Perhaps I needed to use an undercoat?? Too late now!!
I left my model sitting on the work bench as I decided what to do! I gave up and slept on it. I’ll leave you here and tell you what I did to try to overcome this.
Cheers
NzFlyBoy
Video: DORNIER Do24 in Bremen O-TON
Here’s some footage of the magnificent beast in action to while away the time… I know, I know, I’m procrastinating…
Related Posts

Categories
- Airfix Model Airplane Kits
- Airplane History & Use
- Build Reviews
- Dragon Master Kit 1-48 Fw1908A-8
- Featured
- Hasegawa Model Airplane Kits
- Heller Model Airplane Kits
- ICM Model Airplane Kits
- Italeri Model Airplane Kits
- Kiwi Wings Model Airplane Kits
- Model Kit Tips & Techniques
- Revell Model Airplane Kits
- Signifer Model Airplanes
- WW2 Model Airplane Kits


Leave a Comment