
Photo Etch and it’s Application
Now you may have noticed in a couple of my previous posts I’ve mentioned photo etch. This is an important detailing material and it’s application to your model can greatly enhance it’s look and render it more scale accurate.
This is because it’s not possible or practical to render scale thickness in plastic as the plastic would be so thin as to render it unusable. Too thin to handle and in some of the larger models unable to support it’s own weight. So this is where photo etch comes in, usually brass but steel is also used. It’s strong, generally easy to work with, and can render reasonably accurate scale thickness.
Take as an example the flaps of aircraft, not an easy thing to render accurately in smaller scale aircraft, this is where photo etch comes into it’s own. The hinges and internal structure of the flaps can be rendered accurately and when painted it will be indistinguishable from the surrounding plastic of the kitset. Another good reason why we paint our models is to hide the different materials we’ve used and to make it appear as close to the original as possible.
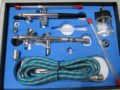
 When you work with photo etch several tools will be needed theses include but are not limited to
- a scalpel with a strong blade to cut the parts free (or similar handle and blade)
- A self healing mat to cut on (I find using a piece of glass and my scalpel as some articles suggest just dulls the blade rendering it worse than useless!)
- A sharp pair of scissors (for clean up of the cut photo etch)
- a straight edge preferably a metal one ( I use a chisel blade from my hobby knife)
- a single sided razor blade to aid bending the etched metal
- super glue, 5 minute epoxy or a soldering iron and solder with flux for a strong durable bond over long distances or curved shapes
- a square
- a spring clamp (to hold the work between the square and the straight edge so it can be bent)
 Now to cut out the part you want, I find it handy to have a container in this case a round tin with foam at the bottom to keep the bent sub assemblies in.
When cutting out in this fashion I find it helpful to keep a finger on the part your removing as the last thin you want to see is your freshly cut part flying off into the distance to become one with the great floor monster!
Cut as close to the leader as is possible this will save you time in the clean up of the loose parts and less frustration in the long run. Remember it’s all about enjoying what your doing and satisfaction for a job done as well as our skill set will provide, practice does after all make adept. (As my eldest is want to say!)

Cleaning up the piece is a simple matter of using a sharp pair of scissors with fine blades. One of the rules I try to follow is don’t ever use a file on the piece of photo-etch. All this does is bend the piece in places where I don’t want it bent. Instead, I use a very sharp small pair of scissors and using the edge of the piece as a guide, cut the leader off. This should produce a nice, clean piece that does not need any filing.
It seems some manufactures can’t help but put the leaders in a place where scissors can’t fit. In this case, I try to cut the leader off as close to the piece as possible and correct any damage later. Sanding sticks (emery boards) can work at a pinch but the part must be held firmly so it can be sanded without it bending the part out of shape.
Post continues…
Sorry, no items were found to display. That could mean that these items are currently not available or that there is a temporary problem.
You could try checking later, or go and search eBay directly.
Another thing you could try is to search Amazon.com.
 Bending is not an easy matter in some of the more complex pieces but I find my way works reasonably well. This is my favorite part.
The idea for this came from a job where the engineer had a sheet metal bending machine. I had wanted to make a box from sheet metal; cut it, fold it and then spot-weld it. To fold it, I used this big machine that I could slide the sheet metal under a clamp until it was right where I wanted the fold. Then I lifted up a handle, which lifted the base the piece of metal was resting on, and bend it to the angle I wanted. The further I lifted the handle the more it would bend the metal.
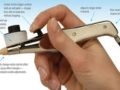
Now, how do I recreate this in miniature? My solution was to use a spring-loaded hand clamp bought at a hardware store, an old square inherited from my father, a chisel blade, and a single sided razor blade.
Place the piece on the square. Remember, the side with the line etched in it is the inside of the bend. Place the chisel blade right on the line that you intend to bend. If it is a ninety-degree bend you want, use the side of the blade. If the bend is more than ninety degrees, use the sharp edge of the blade. Use the clamp to hold the blade where you want it. I find it needs to be pretty close to the line to work effectively.
Work the single sided razor blade under the part not under the clamp and push it right up to the line. Using one motion, lift the handle on the single sided razor blade, using the tip of the blade as a pivot point. If it is a ninety-degree bend, the knife will stop when it reaches the side of the chisel blade. I find I can then run the blade along the edge of the chisel blade and smooth out any imperfections and insure a smooth crease. If it is more or less than a ninety-degree bend, stop where you think you need to stop. Unclamp it and check your bend. Pretty simple, eh?
Correcting mistakes, if any, are made can be actually relatively easy as long as we remain calm! These are ways to correct mistakes that might have occurred like the fold was not done right, the piece was damaged during removal, or sometimes when there is a long fold, the fold might not be even. If the fold is wrong, then take the piece and place it back on the square, put the blade on top of it and squash it back flat with the clamp. Move the clamp around a bit, and squash again. Sometimes I wiggle the piece around under the blade to smooth it out. This is the same method I use to correct damage done to a piece while removing it from the tree.
Sometimes the fold is not straight on long pieces due to the size of the piece and the size of the razor blade. You get kind of a wrinkly fold. When this happens, remove the piece, switch the piece so the part under the blade is now up and the part you bent up is under the blade and squash the wrinkles out. I sometimes move the clamp around to make sure you get all the parts straight. Crease the edge with the razor blade to smooth out the fold, too. Remove the part and check it to see your perfect part!
Attaching the part most the time, you will use superglue of whatever viscosity you choose to attach the part. This is your only choice on resin pieces and metal to metal attachments. I place a small drop on a butter container lid and dip into it with a small wire. Place the glue where you want it, pick up the piece with a pair of tweezers and plop it right where you want it.
Recently, I have been using regular plastic cement to attach tricky parts. Place a dab of regular ‘ol Testor plastic cement where the piece is to be attached. Let it soften a few moments and place the photo-etched piece in place. This gives you a little “wiggle” room to work with. This bond is not as strong as superglue, but I have found it to be good enough for a lot of applications.
There’s nothing worse than prying off a piece of photo-etch held on with superglue because it is at the wrong angle or place. First, you will probably damage the piece, use super glue solvent! Secondly, the piece will probably fly off onto the great floor monster never to be found again. There you have it. An easy, affordable, way to work with photo-etch. No special tools required. Give it a try and see what you think!
Related Posts


Categories
- Airfix Model Airplane Kits
- Airplane History & Use
- Build Reviews
- Dragon Master Kit 1-48 Fw1908A-8
- Featured
- Hasegawa Model Airplane Kits
- Heller Model Airplane Kits
- ICM Model Airplane Kits
- Italeri Model Airplane Kits
- Kiwi Wings Model Airplane Kits
- Model Kit Tips & Techniques
- Revell Model Airplane Kits
- Signifer Model Airplanes
- WW2 Model Airplane Kits


Leave a Comment