
Finishing the Italeri 1:48 P-40M (Kittyhawk IV)

The Painting Process
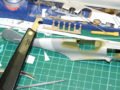
 After finishing the interior of the kit I moved onto the wings and tail planes.The kit has nice and accurate wheel well detail that looks great painted and given an oil wash. I painted the wells interior green and a wash of burnt umber oil paint.
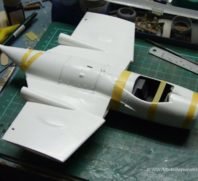
Once the wash was done I added the wings and tail planes, the fit here was good and little or no filler was required. The join on the underside of the fuselage between the wings and the fuselage was also pretty tight with no filler required although some minor sanding was required for an excellent fit.
Once this was done masking the wheel wells and canopy was accomplished with Tamiya masking tape and a fresh scalpel blade. Then on with the paint. I have a couple of Aeromaster paint bottles that I like to use for the paint scheme of olive drab neutral gray camo. This sprays beautifully and leaves a great finish.
Decal Application
Once the paint had dried I covered the model in Klear (future) to aid decal adhesion and stop silvering. When I apply decals on my models I put a thin coat of Klear (future) on where the decal is going to go before placing the decal as this acts as an adhesive and the decal conforms to the surface detail nicely.
Weathering the Subject

Oil Wash & weathering effects
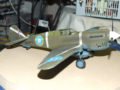
After getting the decals in place I post shaded the panel lines with the airbrush and a thin dirty brown wash sprayed over the lines repeatedly to build up the colour to my satisfaction. I weathered the kit adding soot around the gun ports and exhausts and dirt to the wheels and wheel wells. Now the “dirt” I used was a very light grey as coral dust is almost white and mixed with dirt gives a dirty light grey. Since the modeled aircraft operated in the pacific region, I felt this was appropriate.
After this all that was left was to add the various undercarriage parts and their associated covers and the model was ready for a dull coat to unify the whole model and leave it matte as you’d expect from a front-line well used fighter.
Once all was done, I settled back to look my model over appreciatively and realised to my horror that I had used American Navy blue grey instead of neutral gray! I simply didn’t have the decals to repair this mistake so left it as is and found it a new home!
Closing Comments on the Build
All in all, the kit was a pleasure to put together and provided no real dramas assembling it or painting it, the only real issue was the soft detail around the tail insert that needed a little redefining by re-scribing the panel lines. I have a P40-F/L model to build so I’ll be building this model again but with a Merlin motor!
httpv://www.youtube.com/watch?v=QmAsEa3oPe0
The NZFlyBoy Oil Wash Method:
Now for those of you who are asking yourself what an oil wash is I’ll describe it briefly.
An oil wash is, in my case, a small amount of oil paint (Windsor & Newton) thinned with Tamyia enamel thinners until the colour is almost imperceptible. I usually thin them on an ice cream or Chinese takeaways lid and then apply it to the model. I’ll put a very small amount of the oil paint on the lid and then thin an even smaller part of the blob of oil paint, you’re looking for the consistency of vaguely dirty water. This is then applied over the paint in the area you’re detailing.
A word of caution regarding washes: They need to be of a different kind of paint than the one you’ve used on your model. What I mean by this is if you’ve painted your cockpit using acrylics which are usually thinned with Isopropyl alcohol then using a wash thinned with enamel thinners will be fine as the enamel thinners wont usually attack the acrylic paint. But if you’ve used enamel paint then the thinners will attack the paint and lift it off the plastic. If you plan on using the same types of paint for the cockpit, wheel wells etc and the wash then you’ll need to seal it, Klear (future) is usually a good bet as it uses ammonia as a solvent.
Cheers and happy modelling
NZFlyboy
Related Posts
Categories
- Airfix Model Airplane Kits
- Airplane History & Use
- Build Reviews
- Dragon Master Kit 1-48 Fw1908A-8
- Featured
- Hasegawa Model Airplane Kits
- Heller Model Airplane Kits
- ICM Model Airplane Kits
- Italeri Model Airplane Kits
- Kiwi Wings Model Airplane Kits
- Model Kit Tips & Techniques
- Revell Model Airplane Kits
- Signifer Model Airplanes
- WW2 Model Airplane Kits


Leave a Comment