
Making the 1/72 scale Airfix Bristol Beaufighter
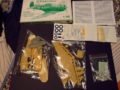
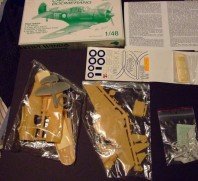
 Last time I wrote about the Airfix Bristol Beaufighter and it’s relationship with RNZAF 489 Squadron of World War 2 in the ETO, here is a link to that article Airfix Bristol Beaufighter 489 Squadron RNZAF ETO. This is an Airfix kit I have recently purchased and have begun to build.
The Airfix Bristol Beaufighter Fuselage
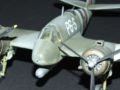
With the removal of the tabs and the addition of styrene tube, I opened up the canon ports (conveniently moulded closed on this kit).
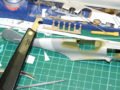
The first major hurdle is the floor, how do we know the size and shape? I would recommend a contour guage. I unfortunately do not own one (yet) so I marked divisions on the bottom of the fuselage and measured the distance to the side wall and marked out the reultant shape on plasticard, this process is repeated for the other side of the fuselage!!. Then cut it out with a scalpel and small steel ruler ( another very important peice of hardware). I needed the floor to follow the bottom of the fuselage as uniformly as possible so I cut lengths of evergreen I beam plastic strip and added them to the bottom of the floor I then glued it to one side of the fuselage and taped the fuselage together and let the glue dry. Once the glue was set I untaped it.


The Airfix Bristol Beaufighter Cockpit
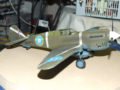
I then proceeded to make the radio operator/gunners chair. An interesting swivel affair. Cutaway drawings on the Beaufighter found in several publications have provided valuable info on the setup inside the Beaufighter. The base of the swivel chair was quickly made out of styrene strip, not to scale though, just what looked right. The swivel base was added, but it too is out of scale, I needed the chair to sit up higher as the base of the chair was not quite tall enough.Still this will be hard to see from the outside once the canopy is in place. I cut a small piece of styrene tube of the diameter of the swivel that looked right and covered both ends with plasticard and cemented it to the frame. I then glued on the chair which I had made from plasticard. Photo’s of this can be seen in the gallery.


My next post will cover the remaining details of the build
Interesting Reading:
Bristol Beaufighter Aeroplane Company
Bristol Beaufighter Night fighter
Related Posts

One Response so far.
Leave a Comment
Categories
- Airfix Model Airplane Kits
- Airplane History & Use
- Build Reviews
- Featured
- Hasegawa Model Airplane Kits
- Heller Model Airplane Kits
- ICM Model Airplane Kits
- Italeri Model Airplane Kits
- Kiwi Wings Model Airplane Kits
- Model Kit Tips & Techniques
- Revell Model Airplane Kits
- Signifer Model Airplanes
- WW2 Model Airplane Kits


[…] Beaufighter Kitset. And left it at the construction of the cockpit, this post can be found here, Making the Airfix Bristol Beaufighter 1/72 scale […]