
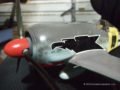
Airfix 1:24 FW 190 A-5: Fuselage Gun Cowling
Hi guys – time for an Airfix 1:24 FW 190 A-5 update I think!
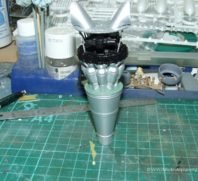
I’ve been only working on ONE item at the moment and that’s the cowl over the machine guns. For some reason known only to Airfix and the gods of plastic kits, Airfix decided that the whole cowl should be covered in rivet detail, lots and lots of it!
After looking at what resources I could find, it was obvious that this wasn’t right. So out came the Tamiya masking tape.
I sliced the Tayima tape into 2mm wide strips to cover over the detail I wanted to keep. (This amounted to the fasteners plus I decided to keep a line of rivets around the cowl.)
I then carefully wiped putty over the rest of the cowl to fill in and cover the rivoting details I didn’t want to show. Sanding followed, lots and lots of it.
Be Careful What Putty You Use
While I was sanding the Italeri brand putty I’d been trialing, simply cracked off and fell away!
It went on beautifully – flowing around the contours of the cowl, “This looks great!” I thought!
However I found that unlike squadron green putty which I usually use, it didn’t actually bond to the plastic. Rather, the Italeri putty formed a hard shell over the cowling. So when I sanded the dry putty it cracked and just fell off!
Note to Self:
“Don’t waste money on Italeri putty”
 So out came the tied and true squadron green putty along with my trusty silicone paint brushes which I use to apply it. I smear the putty on, smooth it into the areas I’m filling and leave to dry.
Now with the Squadron Green putty in place it was back to sanding, which went off without a hitch this time.
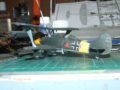
Here are some pics of the Airfix 1:24 Focke-Wulf FW190 Gun Cowling Photos to see for yourself.
Related Posts
Categories
- Airfix Model Airplane Kits
- Airplane History & Use
- Build Reviews
- Dragon Master Kit 1-48 Fw1908A-8
- Featured
- Hasegawa Model Airplane Kits
- Heller Model Airplane Kits
- ICM Model Airplane Kits
- Italeri Model Airplane Kits
- Kiwi Wings Model Airplane Kits
- Model Kit Tips & Techniques
- Revell Model Airplane Kits
- Signifer Model Airplanes
- WW2 Model Airplane Kits


Leave a Comment