
Airfix 1:24 FW 190 A-5: Applying Mal’s Miracle Masks


Hi Guys it’s been a long time and life has been interfering with my modelling! Time to resurrect this build log and finish it off.
After spending around SIX months staring at Mals masks it’s time we took this “relationship to the next level” and actually used the damned things! So hopefully at the end of this weekend I’ll have pics of the start of the painting process. First I needed to purchase some more black and white paint and then it’s time to gird my loins and finish this big beautiful Fw190! Stayed tuned folks this should prove “fun”!
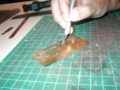
I’ve decided that I would do the masking and painting in sections and that I would start with one of the eagles and both wing crosses.
The masks went on well and are very forgiving as long as you follow Mal’s instructions exactly. My thanks again to Mal of Miracle Masks for all his hard work to make my big and beautiful butcher bird look great! Once the black has had a chance to dry I’ll paint the white and then it’s on to the unveiling!
I got the white on the kit and the crosses look quite stunning! Just a reminder to read all of Mal’s instructions and follow them to the letter as the results you will achieve are quite outstanding!

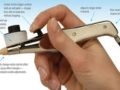
A note of caution about applying masks over complex surfaces: I’ve noticed that in the burnishing of the edges of the masks I’ve moved the masks and created variations of width in the white outline. Also, I need to change the paint I’m using as it’s not keying into the previous paint. I pulled up large amounts of it when I removed the masking medium! Incredibly frustrating as it did look damn stunning until I removed large chunks of black paint.
Painting of the markings continued but the pace was slow. I tried the dry transfer stencils but they have been less than satisfactory so far. I think the low temperature in the “man cave” (garage) is not helping as it’s raining and cold outside, well below the recommended bottom temp of 22 degrees Celsius.
Still the walk way stencils created for me by Mal (Mals Miracle Masks) have worked a treat!Looking really good after the masking has been removed, see for yourself from the pics below!
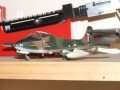
After placing and painting of the Swastika’s I realised that although I had them placed where the Airfix kit instruction sheet suggest, after unmasking I find that they are actually quite a bit smaller than that actually suggested by the instructions, ergo they are way too low…. too late to move them now! I’ll just have to put up with it … for now. Other than that I got the wings and fuselage band painted and now I can start working on the rest of the markings.
I got the fuselage band painted next. I used electrical insulation tape cut into thin strips to outline the fuselage band as it stretches well and you get it to go around curves perfectly. I’m finding aligning the masks a little difficult mainly because that overall mask is obviously bigger than the actual marking. This can lead to a little confusion as to exactly WHERE the right place is.
Next time around (and yes there WILL be a next time as I’m sold on these masks!) I’ll draw pencil lines to aid in exact placement.
I’m definitely sold on the idea of masks for the markings as it gives the model a more life-like feel to it. I’ve also managed to get the stencils for the landing gear on as well and they look FANTASTIC. A little more effort than decals but infinitely a better result.
So with out further a do here are some more progress pics.
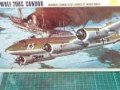
AFXFW098 Focke-Wulf FW190 A-5
Remember that these pics are also in the gallery so you can see them in a much bigger size.
Related Posts

Categories
- Airfix Model Airplane Kits
- Airplane History & Use
- Build Reviews
- Dragon Master Kit 1-48 Fw1908A-8
- Featured
- Hasegawa Model Airplane Kits
- Heller Model Airplane Kits
- ICM Model Airplane Kits
- Italeri Model Airplane Kits
- Kiwi Wings Model Airplane Kits
- Model Kit Tips & Techniques
- Revell Model Airplane Kits
- Signifer Model Airplanes
- WW2 Model Airplane Kits


Leave a Comment