
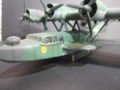
Revell 1:72 Dornier Do24T Flying boat
Okay guys here it is my latest project… the Revell 1:72 Dornier Do24T Flying boat.
Flying boats have always fascinated me, particularly the larger ones like the Short Sunderland, Kawanishi H8K2, Consolidated Catalina, and the Dornier Do24T.
For more history on the aircraft take a look at the Dornier D024T on a website dedicated to the Dornier 24.
This is Revell’s offering of the Dornier Do24T, which I believe is the Italeri mold. The detail is a little sparse, but you can always add that. Panel lines are recessed and more or less to scale. Decals are awesome (view in Dornier Do24T Gallery) with stencils galore depending on the version you build.
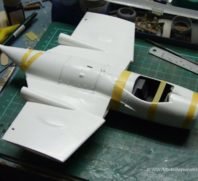
Constructing the Dornier Do24T
 Construction is straight forward starting with the cockpit – very basic but I went to the trouble of adding the radio operators and flight engineers stations, filling in the doorway and adding one in the second compartment as well. Not that much will be seen when you close up the fuselage.
There were not many fit issues during this part of the construction but I added some plasticard strip to the cockpit assembly as it would have been loose without it.
One glaring issue is the cockpit canopy which is way too wide for the fuselage! I fixed this problem by fitting some Evergreen scale models I beam between the fuselage halves and filling the tapered gap that occurred further along the fuselage with gap filling super glue. Which worked incredibly well and looks great! The interior of the fuselage was painted as well as the cockpit and left aside to dry.
I then built the wing/sponsons and added them to the fuselage lying the halves against the cutting board so I could get the sponsons at 90 degrees to the fuselage. This was my first use of the glue for joining seams and it was a breeze. I wondered why I ever stopped using it!
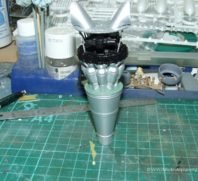
When I built the turrets I found it rather hard to get them to stay in place while the fuselage halves were fitted together! I painted the guns while pondering how to keep the turrets in place while I fitted the fuselage, then suddenly a light went on! Out came my trusty Tamyia masking tape and a single strip across the fuselage and turret kept everything in place while I joined the fuselage halves together.


At this point I should make mention of the fact that I went to Tamyia thin liquid cement to build this kit. It worked a charm simply take the applicator brush in the lid touch it to the seam you want to join and capillary action draws it along the seam. The solvent melts the plastic and drys out very quickly and there is a small amount of resin in it to aid the join.
Tamyia thin liquid cement has the advantage in that you can use it to attach the canopy and it wont fog it up or dis-colour the plastic as it just follows the seam. Another major advantage of this glue is that you can build complex items with a number of parts quickly with a minimum of fuss. Just what was needed when you look at the construction of the wings which is done in three assemblies. The center section with the engines and the outer surfaces with the ailerons and flaps.
(I like Tamyia kits, tools and modeling supplies can you tell???)
I built the three assemblies and then added the outer wings to the center section by fitting them together and joining the bottom surfaces first and then the top, a simple matter of just flowing the cement along the join! Checking the alignment and leaving it over night to cure. The potential nightmare came next trying to join the parasol wing to the fuselage!
Okay Guys and gals that’s it for now but there is lots more to follow!
Cheers
NzFlyBoy
Video: Dornier Do24 – Take off & Landing in High Seas
Related Posts

Categories
- Airfix Model Airplane Kits
- Airplane History & Use
- Build Reviews
- Dragon Master Kit 1-48 Fw1908A-8
- Featured
- Hasegawa Model Airplane Kits
- Heller Model Airplane Kits
- ICM Model Airplane Kits
- Italeri Model Airplane Kits
- Kiwi Wings Model Airplane Kits
- Model Kit Tips & Techniques
- Revell Model Airplane Kits
- Signifer Model Airplanes
- WW2 Model Airplane Kits


Leave a Comment