
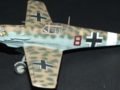
ICM Me109E-7 Trop
Well here it is guys and gals my next project! The ICM Me109E7 Trop also known as the German Messerschmitt Bf 109
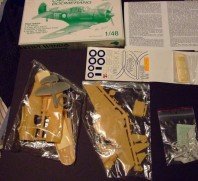
Now this kit is incredibly cheap $10:80 New Zealand , but well detailed! You can see pictures of the kitset in the ICM Me109E7 Trop gallery.
I’ll be building the ICM Me109E-7 Trop OOTB (out of the box) and not modifying the kitset. So this build should be a lot faster. It will be a little trickier as there are no aligning pins on the fuselage. So it will be Tamiya masking tape to the rescue!
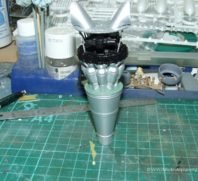
ICM Me109E7 Trop Cockpit
I assembled the cockpit interior and glued the instrument panel in place and then promptly lost the gun sight to the great concrete floor monster. You’d think that being concrete and light grey in colour that it’d stand out, but noooooo it disappears like it was a black hole.
I leave the gun sight for the moment knowing I have something that might do the job in my spares box and move on to gluing the cockpit interior comprising seat, floor rudder pedals and forward bulkhead/firewall, and rear bulkhead. I then glue it into one side of the fuselage this will aid in painting and aligning the fuselage halves.
I then paint the interior which has a colour call out for light olive but I believe that the interiors were painted RLM02 which is a grayish colour. And paint the details, control column, instrument panel and give it a wash with burnt sienna artists oils.
Now hands up those who’ve heard of oil washes?? No? Okay an oil wash is simply this, you take a tube of artists oils and use a solvent (usually artists mineral turpentine) to thin it, so its incredibly thin and transparent then brush this diluted solution over the detail you want to highlight. It’ll pool in the recesses and flow off the highlights leaving convincing smudges and pooling around the detail rendering quite effective shadows.
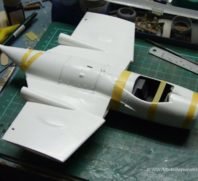
ICM Me109E7 Trop Fuselage & Wings
Having completed the detailing within the cockpit it’s time to assemble the fuselage halves together, which is accomplished quite quickly. With the halves together I then tape it all up with Tamyia masking tape to hold the fuselage aligned while the glue dries. While this was drying I started work on the wings, this time there were aligning pins!Before gluing the wings together I took the opportunity to blank off the radiator baths in the wings with plasticard, as indicated in the ICM 1:7c scale Me109E-7 Trop Gallery
Now it’s time to glue the wings to the fuselage and another problem becomes apparent the gap between wing and fuselage on the bottom of the fuselage. I cover the area with Tamiya masking tape to protect the detail and fill the gap with Tamiya grey putty. Wait for it to cure and then sand it smooth.
About this time I find the spare gun sight and go to glue it into place only to watch it ping off from between the tweezers and disappear on the great concrete floor monster again! Muttering curses I go looking for the errant part only to find the original! So I carefully glue it into place and wait for the glue to dry so that I might paint it! Once dry I painted the gun sight and glued the canopy in place.
Well guys and gals I’ll leave it here I’ll be writing more on painting and decaling the kit in my next post.
Till then, happy modeling!
NZFlyboy
Resources:
Oil Wash technique for ICM Me109E-7 Cockpit
Related Posts
Categories
- Airfix Model Airplane Kits
- Airplane History & Use
- Build Reviews
- Dragon Master Kit 1-48 Fw1908A-8
- Featured
- Hasegawa Model Airplane Kits
- Heller Model Airplane Kits
- ICM Model Airplane Kits
- Italeri Model Airplane Kits
- Kiwi Wings Model Airplane Kits
- Model Kit Tips & Techniques
- Revell Model Airplane Kits
- Signifer Model Airplanes
- WW2 Model Airplane Kits


Leave a Comment