
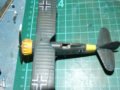
Airfix 1:72 Henschel Hs123: Splinter Camouflage
As I have said before in my previous post, the hardest part of this build and the most time consuming, was masking the splinter camouflage.
German splinter camouflage is relatively easy task to do as the lines are all straight. So out with the Tamiya masking tape and away we go. The largest problem to over come is that the splinter camouflage comes to some very, very fine points and the easiest way to accomplish this is to cut the masking tape before applying it to the kit.
Study the kit and work out where the masking tape should go. I must admit to being relaxed as to how exact the masking job should be. I will sometimes simply go with what is easiest to produce but I will try to stick to the general layout. Another easier way is to use something like Eduard Express masks as these are all pre-cut and extremely easy to use.
Well so it would seem, I’ve read enough articles on them and I have some to use in the various Eduard kits I have in my stash. But I must admit to not using them as of yet. I am however reasonably convinced that given the standard and quality of the Eduard kits these will be no different.
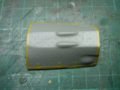
Eduard produce not only masks for German splinter camouflage but also canopy masks to mask a canopy for painting and a variety of other camouglages. Now anyone who has masked a canopy for painting knows this is a tedious and time consuming task! It is also best done with a new scalpel blade or X-acto knife blade. I personally use scalpels as I find them easier to use and incredibly sharp and reasonably resilient.
Fortunately the little Hs123 has virtually no canopy to speak of and therefore little to mask off. I would like to point out here that you don’t have to mask the inside of the canopy to paint it. I find that masking the outside and then painting the interior colour works incredibly well. Just one word of caution you will find some canopies where the internal framing is not matched by the external. The De Havilland Mosquito is a case in point.
Some kit manufacturers, Tamiya springs to mind, have provided the internal framing as decals just for this purpose. or I suggest you could use sellotape and paint it then cut it thinly and apply it on the inside. Sellotape is clear, sticks well and will show the paint quite effortlessly. The only thing about sellotape is that over time the adhesive will deteriorate and begin to peel.


When masking splinter camouflage the general rule of thumb I use is to paint the lighter colour as a base coat mask off and then paint the darker colour. Just remember to allow at least twenty fours hours drying time BEFORE masking the next colour. Even with low tack masking tape if the paint isn’t thoroughly cured it can and will peel off when you remove the masking tape!
A word of caution though the longer you leave masking tape on a model the harder it will be to remove without removing some of your precious paint job! Also very low tack masking tape is essential, now this doesn’t mean that you need to use Tamiya brand at all. 3M Make a variety of low tack masking tapes that are excellent wide and easy to cut shapes in. Ideal if your doing hard edged RAF camouflages! Once the second colour has dried off somewhat you can carefully remove the masks and let it cure before applying the gloss coat for decaling.
For hints on decaling go to my post Model Airplane Decals: Applying and Problem Solving
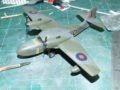
Well that’s about it I guess I’ve added the decals and sprayed the matt coat added the final detail and weathering. it turned out well in my book and I enjoyed immensely building it. You can find all my pics of it my Gallery if you go here Airfix Henschel Hs123.


Related Posts

Categories
- Airfix Model Airplane Kits
- Airplane History & Use
- Build Reviews
- Featured
- Hasegawa Model Airplane Kits
- Heller Model Airplane Kits
- ICM Model Airplane Kits
- Italeri Model Airplane Kits
- Kiwi Wings Model Airplane Kits
- Model Kit Tips & Techniques
- Revell Model Airplane Kits
- Signifer Model Airplanes
- WW2 Model Airplane Kits


Leave a Comment