
Airfix 1:24 FW 190 A-5 Project
Airfix 1:24 FW 190
In my last post I dicussed the Flugwerks FW 190 replica as The Ultimate Kitset aircraft. As I am not currently in the market to buy and build one yet I thought it might be an idea to start a build log for the Airfix 1:24 Fw190 I am building.
I thought it might be a good idea to put the details of and the solutions to the problems I’ve encountered so that others might get some insight!
So here it all is. It may not be the most elegant of builds or the most detailed but I just wanted to sort out the problems and put it here as an encouragement for all of us that have this Airfix 1:24 Fw190 kit in the stash to actually start building it.
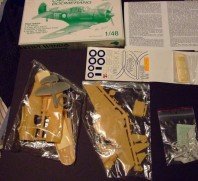
I got the kit off of eBay and it was a bargain! A quarter of the cost of buying it here (New Zealand) and that included the cost of shipping it out to me on the other side of the world! Some of the parts were off the sprue and it was all loose inside the box but as I was going to build this kit, it didn’t matter one iota to me!
If you find yourself lacking some enthusiasm towards starting and finnishing this kit take a look at the video below of the real thing…. The commentary is in German I think but the photography of the airplane’s detail is inspiring
Sourcing After Market Detailing for the Airfix 1:24 FW 190
I started looking around to get some aftermarket details for the kit and started to purchase them.
- Brass barrels for the 7.92mm machine guns,
- Decals from Aeroscale to replace the cockpit instruments and
- Luftwaffe placards for the cockpit.
I talked with Mal from Mal’s masks and have arranged for some masks for the markings as I intend to spray paint them on. Let’s be honest what better scale to use masks but 1/24?
I also found some 1/24 scale dry transfers for the stencils that are so sorely lacking in the Airfix kit. If it’s one thing I would ask of Airfix it’s: to provide better stencilling than what’s available in this kit. Or in this case MPC as it is their re-boxing of the Airfix kit. So here we go lets get this started!
Begining to build the Airfix 1:24 Fw190
We’ve all heard that the 1:24 Airfix kit has fit issues, the engine, the forward panels and the wing to fuselage to mention a few. I’ve even heard it said the kit is nearly unbuildable. However after studying what was available on the web and the drastic measures taken to make it all fit. I was determined to use the kit parts and not resort to drastic surgery if I could at all help it.
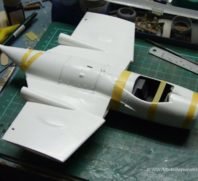
First off I assembled the cockpit as per the kits instructions with just a couple of deviations. I didn’t glue the bottom instrument panel into place I left it loose as I was intending to use the Aeroscale decals as a replacement. But in left it in place so that the fuselage gun mounts set at the correct angle. Just remember to file the lower instrument parts at an angle so that it fits perfectly and that the top of the gun mounts sits flush against the top of it. just remember this part (the gun mount) is angled and does not sit at right angles as you might expect. After everything was sufficiently dried I sprayed the cockpit tub, walls and instrument panel RLM66 and the inside of the fuselage RLM02. It was very easy to mask off the cockpit walls and spray them. After the paint was dry the next morning I got out the Aeroscale cockpit placards and decided which and how many of them I was going to use. I used about ten or so in the end and they really enhanced the look of the cockpit.
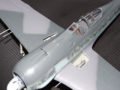
I also installed the tail wheel but I didn’t install the other half of the fork and the tail wheel just the oleo strut and retracting gear which I glued into place as this is going to be a static model. I taped the two halves of the fuselage together while it was drying so that I could fit the cockpit tub and sort out the fit issues. It was at this point I decided that rather than completely scratch build another instrument panel that I would use the kit parts paint the back of the clear parts black and the instrument panels RLM66. I then dry brushed the front of the dials white which really popped the details out but still showed the black painted on the back. I then glued this into the cockpit and set it aside to dry over night.
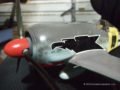
The cockpit tub was one of the first problems I tackled, it became apparent very quickly that it was not shaped to easily fit into the fuselage. I’d already taped the fuselage halves together so the tail wheel assembly could dry in place and while taped together I filed the cockpit tub till it fit more or less perfectly and the instrument combing actually met! It took a couple of hours of filing and sanding but the end result was more than worth it. I glued the bottom portion of the fuselage (the parts visible in the inboard canon bays) on first and let it dry overnight but clamped in place by spring clamps and then I glued the halves and the cockpit tub together held in place by Tamiya masking tape till it had dried overnight.
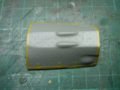
Unfortunately I should have taken more in progress shots than I did but here a few of the pics I did take to help with what I’m saying. You can view the Airfix 1:24 FW 190 A-5 Project Photos in the Gallery.
Airfix 1:24 Fw190 Fit Tips
The thing of greatest importance is to let it all dry before moving onto the next part of the build as it needs to be as rigid as possible when you work with the next step. I’m certain that if I tried to glue it all together at once that it would’ve warped, moved and created more issues for me.
The other thing to do is when you’re gluing parts together and they rely on other parts for their correct alignment you need to tape the related parts together, so the glued part will set up correctly, if you don’t you will generate more work in the filing, filling and sanding department to get it to fit.
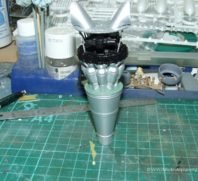
In my next post I will look at how to get the engine to fit
Interesting Reading about the FW 190
History behind the Airfix 1:24 FW 190 A-5
Operational history behind the Airfix 1:24 FW 190 A-5
Related Posts


Categories
- Airfix Model Airplane Kits
- Airplane History & Use
- Build Reviews
- Dragon Master Kit 1-48 Fw1908A-8
- Featured
- Hasegawa Model Airplane Kits
- Heller Model Airplane Kits
- ICM Model Airplane Kits
- Italeri Model Airplane Kits
- Kiwi Wings Model Airplane Kits
- Model Kit Tips & Techniques
- Revell Model Airplane Kits
- Signifer Model Airplanes
- WW2 Model Airplane Kits


Leave a Comment