
Airfix 1:24 FW 190 A-5: How to Get the Engine to Fit
Airfix 1:24 FW 190
Following on from my last post I am now faced with solving the problem of how to get the engine to fit on the Airfix 1:24 FW 190 A-5.
Sanding the Engine Parts on the Airfix 1:24 FW 190 A-5
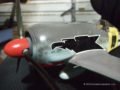
I spent some time working out how best to approach the second hurdle that of the engine cooling fan sitting 6mm too far forward and decided to sand every flush fitting surface. Remember to sand both cylinder heads as this is where most of the excess width lies. I also took the step of sanding the engine mounting ring and recessing the engine mounts by about 2mm.
This necessitated the filing of the engine mount attachments so that they would fit into the recessed holes. It didn’t take all that long and I’ll be the first to admit that it was all guess work, however it turned out pretty much on the money! I then assembled the engine after painting it what colours I thought were the relevant ones and gave the aluminium cylinder heads a black oil wash to make the details pop out.
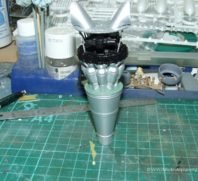
Mounting the the Engine on the Airfix 1:24 FW 190 A-5
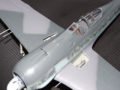
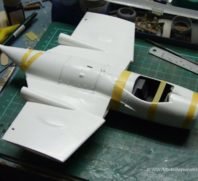
I then glued the bottom wing onto the fuselage and clamped it to the part of the cowl that are moulded onto the fuselage. Once this had dried overnight I glued in the engine and left it all to dry. I used Tamiya masking tape to ensure the engine was held in place while the glue dried. And that it fit flush with the engine mounting ring. Just a note here to on the glue I use, I use Tamiya’s extra thin cement as it melts the plastic and with a little pressure the join becomes pretty much solid plastic. it provides the necessary strong bond between parts that is important to this build. I use thin super glue too but this is more as a filler than it’s gluing properties.
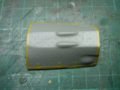
I glued the oil ring to the front cowl and then the top three panels to that and left it all to dry overnight. Then I fitted it to the lower parts of the cowl. The fit was not that great but to get it all to conform I used some styrene shims to pack out the gaps and then I used electricians insulation tape, the glory of this tape is that you can stretch it and it’ll pulled all the panels together nicely!
I didn’t fit the exhausts until I had the engine actually mounted and dry in the fuselage as I filed the parts and bent them a little to fit when I installed them. Again having the engine rigid and in place helped with the fitting of theses parts. A word of caution though the underside of the exhausts will need filing to fit onto the fuselage so that it all sits as it should. Again a lot of dry fitting is best so that everything fits with a minimum of force.


The next step in the project is adding the Main Spars
Until next time…
NZFlyBoy
Further Research
Airfix 1:24 FW 190 Kit Video Review on YouTube (actual review begins a minute into the video)
Related Posts


Categories
- Airfix Model Airplane Kits
- Airplane History & Use
- Build Reviews
- Dragon Master Kit 1-48 Fw1908A-8
- Featured
- Hasegawa Model Airplane Kits
- Heller Model Airplane Kits
- ICM Model Airplane Kits
- Italeri Model Airplane Kits
- Kiwi Wings Model Airplane Kits
- Model Kit Tips & Techniques
- Revell Model Airplane Kits
- Signifer Model Airplanes
- WW2 Model Airplane Kits


Leave a Comment